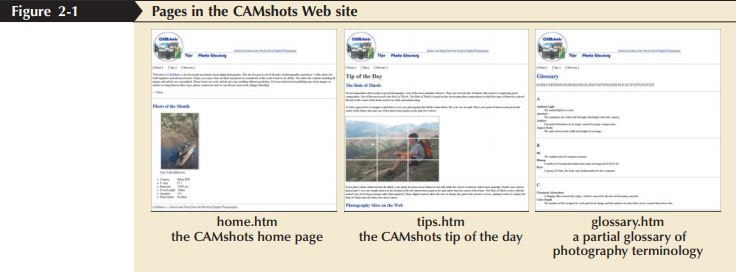
Gerry wants to create links among the three pages so that users can easily navigate from one page to another. Before you write code for the links, it’s worthwhile to map out exactly how you want the pages to relate to each other, using a technique known as storyboarding. A storyboard is a diagram of a Web site’s structure, showing all the pages in the site and indicating how they are linked together. Because Web sites use a variety of structures, it’s important to storyboard your Web site before you start creating your pages. This helps you determine which structure works best for the type of information your site contains. A well-designed structure ensures that users will able to navigate the site without getting lost or missing important information. Every Web site starts with a single home page that acts as a focal point for the Web site. It is usually the first page that users see. Starting from the home page, you add the links to other HTML 62 HTML and XHTML Tutorial 2 Developing a Web Site pages in the site, creating the site’s overall structure. The Web sites you commonly encounter as you navigate the Web use one of several different Web structures. Examine some of these structures to help you decide how to design your own sites
Creating Links
Types of Page Structures
Linear Structures
If you wanted to create an online version of a famous play, like Shakespeare’s Hamlet, one method would be to link the individual scenes of the play in a long chain. Figure 2-2 shows the storyboard for this type of linear structure, in which each page is linked with the pages that follow and precede it. Readers navigate this structure by moving forward and backward through the pages, much as they might move forward and backward through the pages of a book.
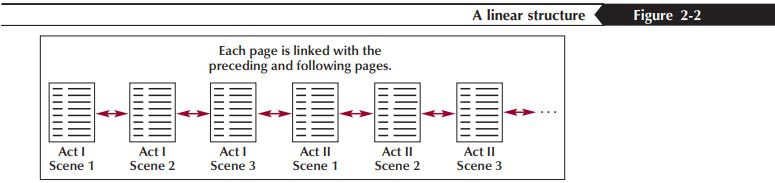
Linear structures work for Web sites with a clearly defined order of pages that are small in size. However, they can be difficult to work with as the chain of pages increases in length. An additional problem is that in a linear structure you move farther and farther away from the home page as you progress through the site. Because homepages often contain important general information about the site and its author, this is usually not the best design technique. You can modify this structure to make it easier for users to return immediately to the home page or other main pages. Figure 2-3 shows this online play with an augmented linear structure, in which each page contains an additional link back to the opening page of each act.

Hierarchical Structure
Another popular structure is the hierarchical structure, in which the pages are linked going from the home page down to pages dedicated to specific topics. Those pages, in turn, can be linked to even more specific topics. So, a hierarchical structure allows users to easily move from general to specific and back again. In the case of the online play, you can link an introductory page containing general information about the play to pages that describe each of the play’s acts, and within each act you can include links to individual scenes. See Figure 2-4. With this structure, a user can move quickly to a specific scene within the page, bypassing the need to move through each scene in the play.

Mixed Structures
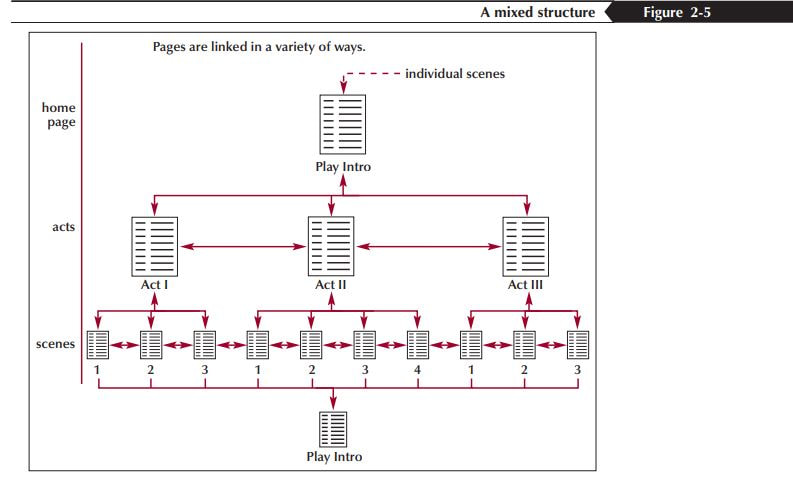
With larger and more complex Web sites, you often need to use a combination of structures. Figure 2-5 shows the online play using a mixture of the three main structures. The overall form is hierarchical, as users can move from a general introduction down to individual scenes; however, users can also move through the site in a linear fashion, going from act to act and scene to scene. Finally, each individual scene contains a link to the home page, allowing users to jump to the top of the hierarchy without moving through the different levels.
Creating a Hypertext Link
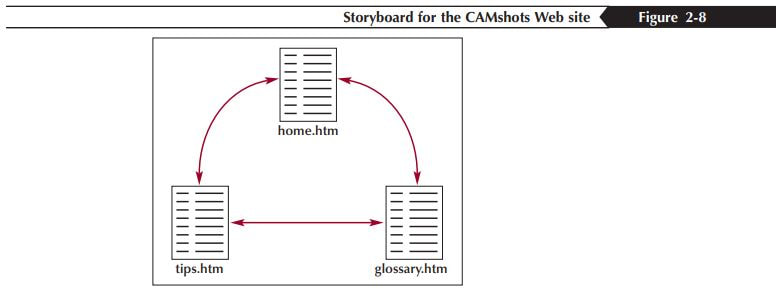
Gerry wants his site visitors to be able to move effortlessly among the three documents he’s created. To do that, you’ll link each page to the other two pages. Figure 2-8 provides the storyboard for the simple structure you have in mind.
To create these links, you have to add hypertext links to each of the three documents. Hypertext links are created by enclosing some document content with a set of opening and closing tags.
The general syntax to create a hypertext link is:
< a href="reference"> content </a>
where reference is the location being linked to and content is the document content that is being marked as a link. The reference value can be a page on the World Wide Web, a local file, an e-mail address, or a network server. For example, to create a hypertext link to the tips.htm file,
you could enter the following code:
you could enter the following code:
<a href="tips.htm"> Photography Tips </a>
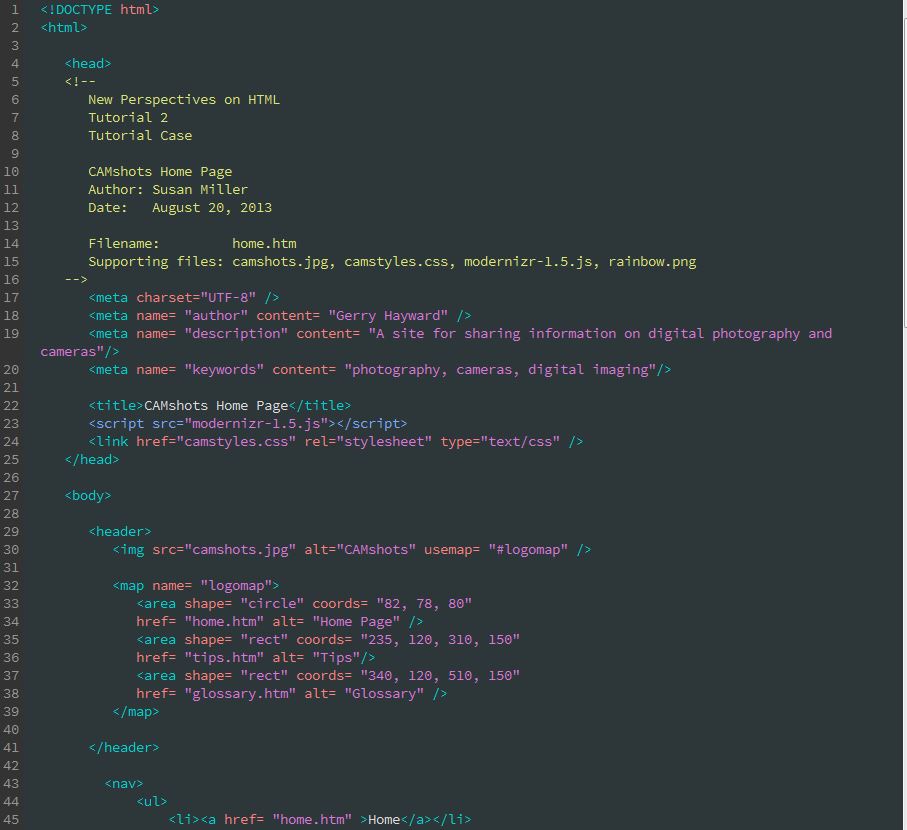
This code marks the text “Photography Tips” as a hypertext link. When rendered by the browser, the words “Photography Tips” will be underlined, providing a visual clue to the user that the text is linked to another document. If the user clicks the text with a mouse, the browser will load the linked document (tips.htm). Filenames are case sensitive on some operating systems, including the UNIX and Macintosh operating systems. Web servers running on those systems differentiate between a file named tips.htm and Tips.htm. For this reason, you might find that links you create on your computer do not work when you transfer your files to a Web server. To avoid this problem, the current standard is to always use lowercase filenames for all Web site files and to avoid using special characters such as blanks and slashes (/). At the top of the home.htm, tips.htm, and glossary.htm files, Gerry has already entered the names of each of his three documents. Your first task will be to mark these names as hypertext links to each of Gerry’s three files. You’ll start with the names in the home.htm file.


Linking to Locations within Documents
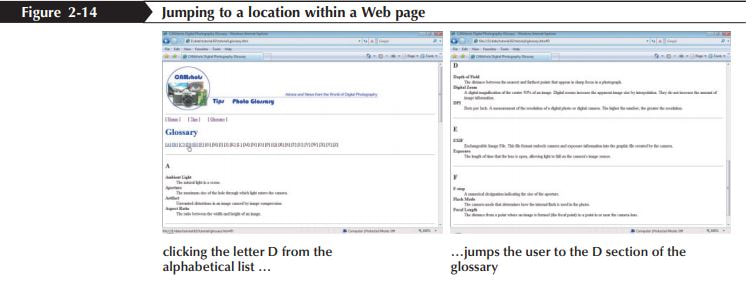
Gerry likes the links you’ve created in the last session and would like you to add some more links to the Glossary page. Recall that the Glossary page contains a list of digital photography terms. The page is very long, requiring users to scroll through the document to find a term of interest. At the top of the page Gerry has listed the letters A through Z. Gerry wants to give users the ability to jump to a specific section of the document by clicking a letter from the list. See Figure 2-14.
Using the id Attribute
To jump to a specific location within a document, you first need to mark that location. One way of doing this is to add an id attribute to an element at that location in the document.
The syntax of the id attribute is
The syntax of the id attribute is
id="id"
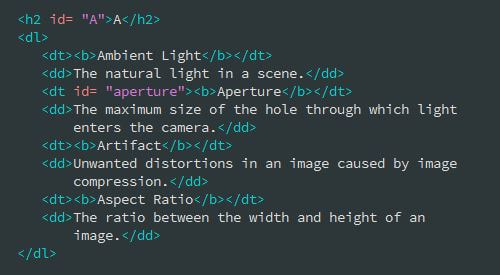
where id is the value of the element id. For example, the following code marks the h2 element with an id value of H:
<h2 id="H"> H </h2>
Note that id names must be unique. If you assign the same id name to more than one element on your Web page, the browser uses the first occurrence of the id name. XHTML documents will be rejected if they contain elements with duplicate ids. Id names are not case sensitive, so browsers do not differentiate between ids named top and TOP.

Example of how we will use this in the lesson:

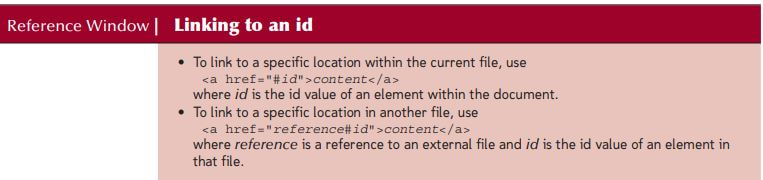
Linking to an id
Once you’ve marked an element using the id attribute, you can create a hypertext link to that element using the hypertext link
<a href="#id"> content </a>
where id is the value of the id attribute of the element. For example, to create a link to the h2 heading for the letter A in the glossary document, you would enter the following code:
<a href="#A"> A </a>
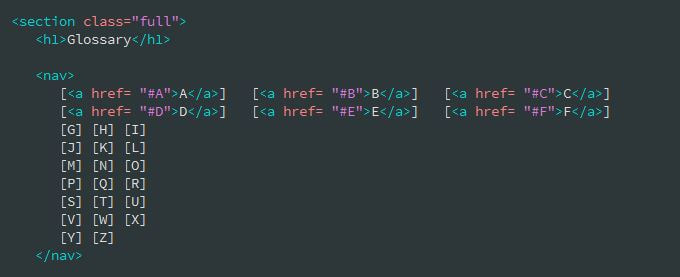
You will use this code to change the entries on the Glossary page to hypertext links pointing to the section of the glossary corresponding to the selected letter in the lesson.
Example from lesson:
Hypertext links for the list of letters
Hypertext link to return to top of the document

Creating Links between Documents
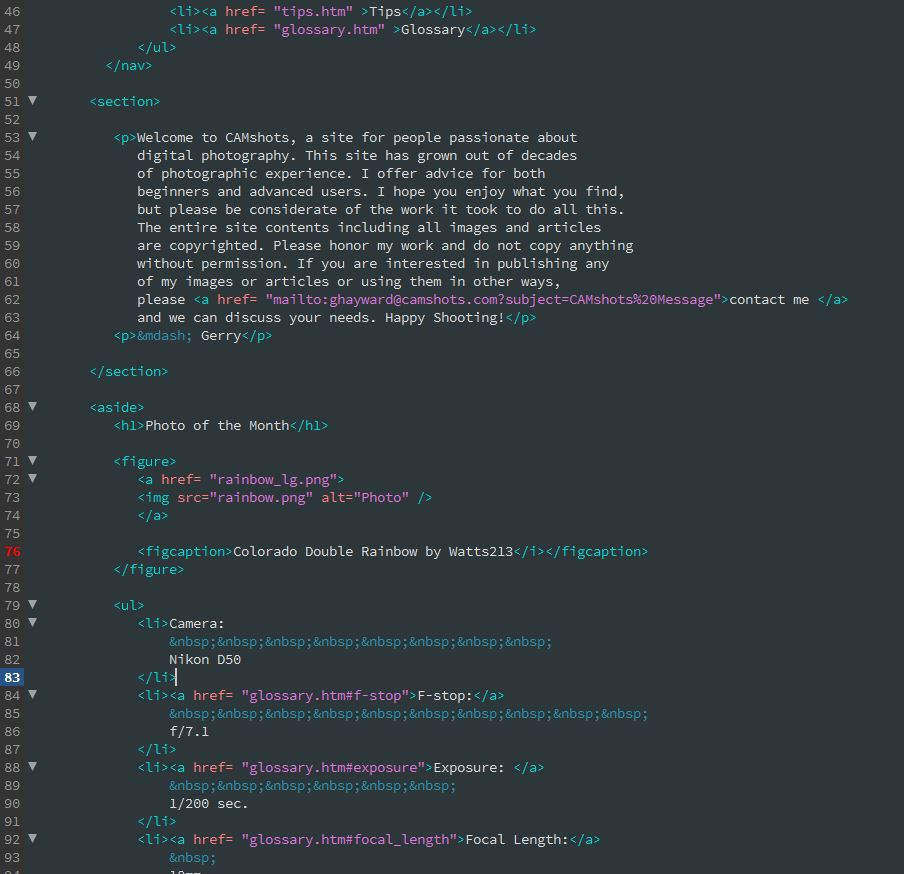
Gerry knows that the glossary will be one of the most useful parts of his Web site, especially for novice photographers. However, he’s also aware that most people do not read through glossaries. He would like to create links from the words he uses in his articles to glossary entries so that readers of his articles can quickly access definitions for terms they don’t understand. His articles are not on the same page as his Glossary page, so he will have to create a link between those pages and specific glossary entries.
To create a link to a specific location in another file, enter the code:
To create a link to a specific location in another file, enter the code:
<a href="reference#id"> content </a>
where reference is a reference to an HTML or XHTML file and id is the id of an element marked within that file. For example, the code
<a href="glossary.htm#D"> "D" terms in the Glossary </a>
creates a hypertext link to the D section in the glossary.htm file. This assumes that the glossary.htm file is located in the same folder as the document containing the hypertext link. If not, you have to include either the absolute or relative path information along with the filename, as described in the last session.
Example from lesson:

Introducing Image Maps
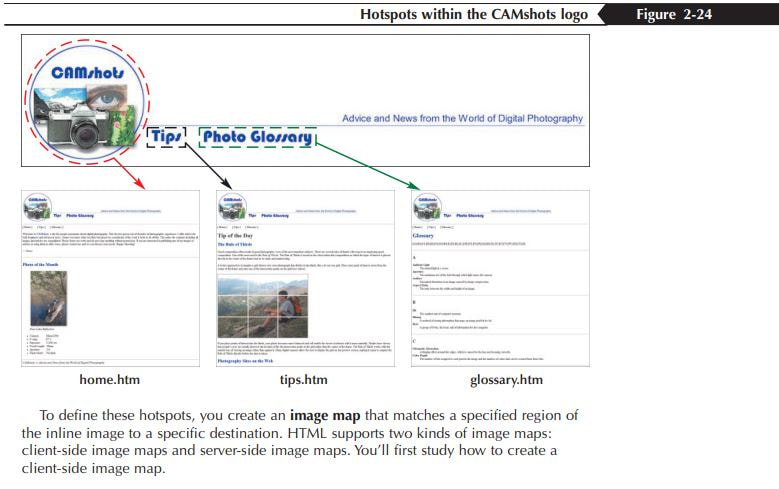
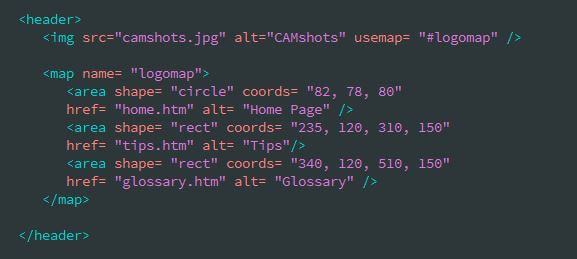
When you mark an inline image as a hypertext link, the entire image is linked to the same destination file; however, HTML also allows you to divide an image into different zones, or hotspots, each linked to a different destination. Therefore, a single inline image can be linked to several locations. Gerry is interested in doing this with the CAMshots logo. He would like you to create hotspots for the logo so that if the user clicks anywhere within the CAMshots circle on the left side of the logo, the user jumps to the Home page, while clicking either Tips or Photo Glossary in the logo takes the user to the Tips page or the Glossary page. See Figure 2-24.
Client-Side Image Map
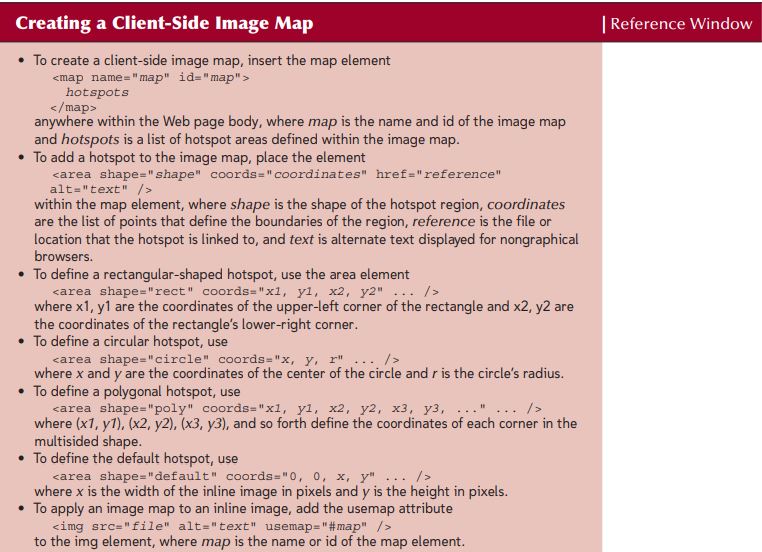
A client-side image map is an image map that is handled entirely by the Web browser running on the user’s computer. Client-side image maps are defined with the map element
<map id="map" name="map"> hotspots </map>
where map is the name of the image map and hotspots are the locations of the hotspots within the image. Each image map has to be given an id and a name. You have to include both attributes, setting them to the same value, because HTML code requires the name attribute and XHTML requires the id attribute. As long as you include both, your code will work under all browsers. For example, the following code creates a map element named logomap:
<map id="logomap" name="logomap"> ... </map>
Map elements can be placed anywhere within the body of the Web page because they are not actually displayed by the browser, but used as references for mapping hotspots to inline images. The common practice is to place the map element below the inline image.
Defining Hotspots
The individual hotspots are defined using the area element
< area shape="shape" coords="coordinates" href="reference" alt="text"/>
where shape is the shape of the hotspot region, coordinates are the list of points that define the boundaries of the region, reference is the file or location that the hotspot is linked to, and text is alternate text displayed for nongraphical browsers. Hotspots can be created in the shape of rectangles, circles, or polygons (multisided figures). So, the shape attribute can have the value rect for a rectangular hotspot, “circle” for a circular hotspot, and “poly” for a polygonal or multisided hotspot. A fourth shape option is “default,” representing the remaining area of the inline image not covered by hotspots. There is no limit to the number of area elements you can add to an image map. Hotspots can also overlap. If they do and the user clicks an overlapping area, the browser opens the link of the first hotspot defined in the map. Hotspot coordinates are measured in pixels, which are the smallest unit or dot in a digital image or display. Your computer monitor might have a size of 1024 x 768 pixels, which means that the display is 1024 dots wide by 768 dots tall. The CAMshots logo that Gerry uses in his Web site has a dimension of 778 pixels wide by 164 pixels tall. When used with the coords attribute of the area element, the pixel values exactly define the location and size of the hotspot region. Each hotspot shape has a different set of coordinates that define it. To define a rectangular hotspot, enter
< area shape="rect" coords="x1, y1, x2, y2" .../>
where x1, y1 are the coordinates of the upper-left corner of the rectangle and x2, y2 are the coordinates of the rectangle’s lower-right corner. Figure 2-25 shows the coordinates of the rectangular region surrounding the Photo Glossary hotspot.
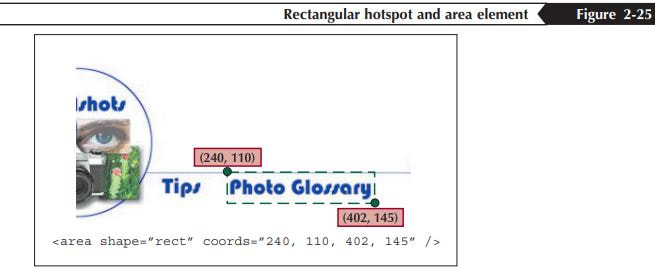
The upper-left corner of the rectangle has the coordinates (240, 110). The lower-right corner is found at the coordinates (402, 145). Coordinates are always expressed relative to the image’s top-left corner. A coordinate of (240, 110) refers to a point that is 240 pixels to the right and 110 pixels down from the image’s top-left corner. Circular hotspots are defined using the area element:
< area shape="circle" coords="x, y, r" .../>
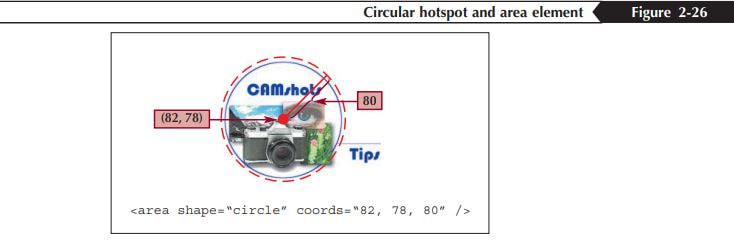
where x and y are the coordinates of the center of the circle and r is the circle’s radius. Figure 2-26 shows the coordinates for a circular hotspot around the CAMshots image from the Web site logo. The center of the circle is located at the coordinates (82, 78) and the circle has a radius of 80 pixels.
Applying an Image Map
To apply an image map to an image, add the usemap attribute to the inline image’s tag.
The syntax is
The syntax is
<img src="file" alt="text" usemap="#map" />
where map is the id or name of the map element. If you place the map element in a separate file, you can reference it using the code:
<img src="file" alt="text" usemap="reference#map" />
where reference is a reference to an HTML or XHTML file containing the map element. Unfortunately, most browsers do not support this option, so you should always place the image map in the same file as the inline image. You’ll apply the logomap to the CAMshots logo and then test it on your Web browser!
Example from lesson:
Link to Resources on the Internet
Introducing URLs
To create a link to a resource on the Internet, you need to know its URL. A URL, or Uniform Resource Locator, specifies the precise location of a resource on the Internet. Examples of URLs include www.whitehouse.gov, the home page of the President of the United States, and www.w3.org, the home page of the World Wide Web consortium. All URLs share the common form
scheme:location
where scheme indicates the type of resource referenced by the URL and location is the location of that resource. For Web pages, the location refers to the location of the HTML file; but for other resources, the location might simply be the name of the resource. For example, a link to an e-mail account has the e-mail address as the resource. The name of the scheme is taken from the protocol used to access the resource. A protocol is a set of rules defining how information is passed between two devices. Your Web browser communicates with Web servers using the Hypertext Transfer Protocol or HTTP. Therefore, the URLs for all Web pages must start with the http scheme. This tells the browser to use http when it tries to access the Web page.
Linking to a Web Site
The URL for a Web page has the general form
http://server/path/filename#id
where server is the name of the Web server, path is the path to the file on that server, filename is the name of the file, and if necessary, id is the name of an id or anchor within the file. A Web page URL can also contain specific programming instructions for a browser to send to the Web server (a topic beyond the scope of this tutorial). Figure 2-32 shows the URL for a sample Web page with all of the parts identified.
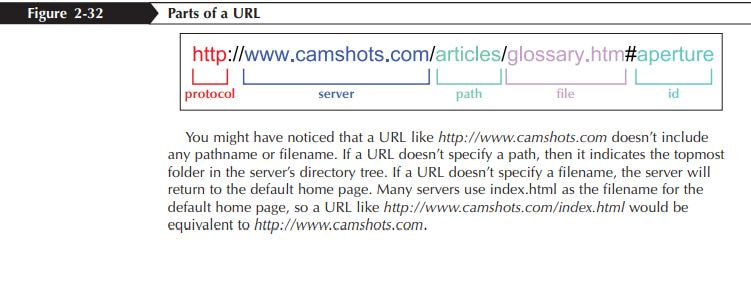
The server name portion of the URL is also called the domain name.
(You often just see the url written with the server or domain name.)
(You often just see the url written with the server or domain name.)
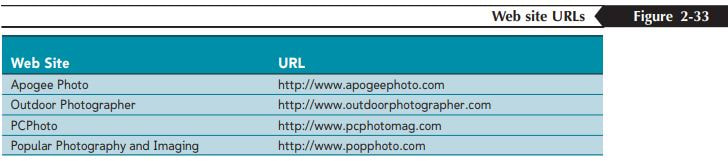
To create a link to these Web sites from your document, you need to mark some text as a hypertext link, using the URL of the Web site as the value of the href attribute. So to link the text “Apogee Photo” to the Apogee Photo Web site, you would enter the following code:
< a href="http://www.apogeephoto.com"> Agogee Photo </a>
Linking to an E-Mail Address
Many Web sites use e-mail to allow users to communicate with a site’s owner, sales representative, or technical support staff. You can turn an e-mail address into a hypertext link, so that a user can click the link starting an e-mail program and automatically inserting the e-mail address into the “To” field of a new outgoing message. The URL for an e-mail address follows the form
mailto:address
where address is the e-mail address. To create a hypertext link to the e-mail address [email protected], you could use the following URL:


Opening a Secondary Window or Tab
By default, each page you open replaces the contents of the current page in the browser window. This means that when Gerry’s readers click on one of the four external links listed on the tips page, they leave the CAMshots Web site. To return to the Web site, users would have to click their browser’s Back button. Gerry wants his Web site to stay open when a user clicks one of the links to the external Web sites. Most browsers allow users to open multiple browser windows or multiple tabs within the same browser window. Gerry suggests that links to external sites be opened in a second browser window or tab. He wants these external sites to be displayed in a second browser window or tab. This arrangement allows continual access to his Web site, even as users are browsing other sites. To force a document to appear in a new window or tab, add the target attribute to the tag.
The general syntax is:
The general syntax is:
<a href="url" target="window"> content </a>
where window is a name assigned to the new browser window or browser tab. The value you use for the target attribute doesn’t affect the appearance or content of the page being opened; the target simply identifies the different windows or tabs that are currently open. You can choose any name you wish for the target. If several links have the same target name, they all open in the same location, replacing the previous content. HTML also supports several special target names, described in Figure 2-41.
Creating a Tooltip
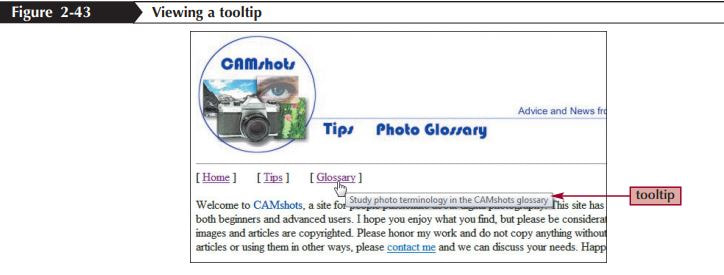
If you want to provide additional information about a link on your Web page, you can add a tooltip to the link. A tooltip is descriptive text that appears when a user positions the mouse pointer over a link. Figure 2-43 shows an example of a tooltip applied to one of Gerry’s links
To create the tooltip, add the title attribute to the opening tag in the form
<a href="url" title="text" > content </a>
where text is the text that appears in the tooltip. To create the tooltip shown in Figure 2-43, you would enter the following HTML code:
<a href="glossary.htm" title="Study photo terminology in the CAMshots glossary"> Glossary </a>
Note that because some browsers do not support this feature, you should not place crucial information in a tooltip.
Okay! Lets try this :
| tutorial_2_camshots.doc |
CAMshots Key: home page
Check your work!

CAMshots: glossary
Tutorial Downloads:
|
| ||||||||||||||||||||
